Pages

Monday, June 28, 2010

Welcome to Abby & Walter's New Home (MPS 35)


This week the challenge at Michelle Perkett's Studio is Cutting, Cutting, Cutting!!!  You will find the challenge here.

I recently bought the Walter & Abby image from the very talented Michelle & promised to give them a new home.  :)  Well, here it is, so welcome to Abby & Walter's:-


The challenge is all about cutting.  Apart from the punched garden greenery & the doorknobs, all my cutting has been done by hand with either small scissors or a scalpel.  (Oops, sorry I forgot I used a border punch for the bottom of the curtain!)

Come inside, Walter is waiting for you:-


& here is Abby:-


 Here's a close up of Walter (isn't he adorable?):-


Here are some of the fine details:-

Well, this little creation is just something I wanted to try for fun.  The whole thing folds shut to a 5x5 inch card with the floors folding up either side of the central wall.  All the straight edges were cut with a ruler & scalpel.  To get the curved edges in the floors I cut around an upturned dinner plate!  There is acetate in the window & the curtain is cut from vellum.  I added the spotty pattern to the curtain with a white glaze pen to co-ordinate with the dotty pattern on the "carpet".  All the balloons have been given a coating of Crystal Effects to give them a nice glossy finish.  They are "anchored" to the balloon weights & to Walter's tail with a single strand of fibre from soft kitchen string.  (Looks good but it breaks easily!!!)

The birdcage in Walter's room has been stamped straight onto the wall & coloured up with a silver gel pen.  The floor boards were created on the white cardstock with pencils, watercolour pencils & stamp pad ink.  The boards & nails were added last with a chocolate stamping marker.

Walter, Abby & the stack of presents were laser printed onto watercolour paper & coloured with stamp pad inks, watercolour pencils & an aquapainter.  They have had clear glaze & glitter pen highlights added to them.  They are all "popped up" on dimensionals.  Some "architectural highlights" include the door panelling (chalk edged rectangles) & wood panelling in Abby's room.  The "wallpaper" is a single flower stamp, that I stamped repeatedly with the help of my trusty stamp positioner!!!

Hope you enjoyed your visit with Abby & Walter!

The inspiration for the colour theme came from JAI's last challenge (see my post here).  I love these colours together, so used them as a starting point for the project.  :)

Card Components:
Cardstock:  Whisper White, Tempting Turquoise, Kiwi Kiss, Rich Razzleberry, Melon Mambo
DSP:  Sorry, not sure what it's called, but it's retired SU
Stamps:  Abby & Walter's Birthday Wish (Michelle Perkett), ? 2010 Sale-A-Bration Set (SU), Balloons from Sock Monkey (SU)
Inks:  Tempting Turquoise, Kiwi Kiss, Rich Razzleberry, Chocolate Chip Marker, Blush Blossom, So Saffron, Close to Cocoa, Basic Black, Pretty In Pink, Pumpkin Pie
Other:  Watercolour Pencils, Acetate, Crystal Effects, Glitter Pen, White & Clear Glaze Pens, Scallop Edge Punch, Fern Punch, Flower Punch, Office Hole Punch, Silver & Gold Gel Pens, Kitchen String, Dimensional Adhesives

Monday, June 21, 2010

Moving House (JAI22)


Woohoo, what gorgeous colours the ladies at JAI set for their challenge this week!  Thanks Bron.  :)

Here they are:-


These colours worked perfectly for a gift I wanted to make for my lovely co-worker, Jane, who has just moved house.  I have made a set of ten address cards & envelopes for Jane to post out to family & friends.  The cards all have a magnet on the back so the recipient can hang them on their fridge/filing cabinet so the details don't get lost.  I have packaged them in a matching box which has a favourite sentiment of mine "Home is where you hang your heart".

Here's how they turned out (click on the photo for a larger view):-


To make the little house "scene" on each card, I have stamped the roof & chimney in turquoise onto white cardstock & stamped one of the little trees beside it with kiwi, then punched it out with a circle punch.  I have punched out a circle from kiwi cardstock & then slid it into the large oval punch to create the mound for the house to sit on.  I have inked the house walls stamp with turquoise ink, but before I stamped it I used an old, dry blender pen to remove the ink from the door knob & the heart & then used inked blender pens to colour the heart razzleberry & the doorknob kiwi.  Bit of a fiddly job, but love the result!  I cut the walls out & layered it onto the grass mound.  I handcut a footpath from white CS & butted it up to the door.  The roof was stamped with versamark & razzleberry onto white cardstock & clear heat embossed.  I then cut out the roof & popped it up on dimensionals.  The completed scene was added to a turquoise circle & then the scalloped circle & popped up on dimensionals.  I added clear glaze to the heart, doorknob, window panes & footpath.

The printing on the cards & the lid of the box was computer generated, except for the word "heart" which was stamped with razzleberry ink.  To ink the stamp I made a cardstock mask.  I stamped onto a piece of scrap cardstock & then carefully cut close around the word "heart" & removed this piece.  I laid the piece I was left with over the rubber so that the only part of the stamp that was showing was the word "heart" which I inked & stamped.  When using a dark ink I find this gives a better result than inking the whole stamp & cleaning off the bits you don't want.

Make sure you go check out all the DT's amazing inspiration pieces & entries in the challenge here!

This is the card I made to go with the gift:-


Poor Jane is probably so sick of packing/unpacking boxes, I thought she might get a laugh out of this.  It's a stack of packing boxes & the sentiment inside reads "Thought you might enjoy opening boxes that you DON'T have to UNPACK!!  Wishing you happiness in your new home."

There's no stamping on this one.  I have just layered the boxes to create dimension, added string & computer generated "stickers".  The edges of all the boxes have been chalked to add depth.  The card contains an exploding insert & is held shut with a magnet closure.  You can see another of my exploding insert cards here.

Edited (24/06/10) to add:

Thank you to the lovely JAI ladies for selecting my submission as a top pick this week.  It was a great colour combo to work with & there's lots of great entries for you to go check out here as well as the amazing DT work.

Thank you so much to everyone who took the time to comment.  It is much appreciated.  :)

BTW, Jane loved the gift & she got a good laugh out of the "packing box" card as well. 

Card & Box Components
Cardstock:  Kiwi Kiss, Rich Razzleberry, Tempting Turquoise, Whisper White, Kraft
DSP:  Kiwi Kiss Patterns DSP 
Stamps:  Good Neighbours, Whimsical Words
Inks:  Kiwi Kiss, Rich Razzleberry, Tempting Turquoise
Other:  Satin Ribbon, Scallop Circle Punch, 1.1/2" Circle Punch, 1.3/8" Circle Punch, Large Oval Punch, Dimensionals, Clear Glaze Pen, Magnetic Strip, String, SU Pastels (Chalks)

Tuesday, June 15, 2010

Sunny Day Balloons (JAI 21)


This week's challenge at Just Add Ink is this very versatile sketch:-


The team have provided lots of great inspiration with cards, scrapbook pages & a journal!  :)

I have rotated the sketch 90 degrees & changed the straight lines to wavy ones.  Here is my card:-


The balloon baskets have been stamped with versamark & chocolate chip ink & then clear embossed.  I have coloured in the gaps of the basket design with brown pencil to make the baskets look more solid.  I have also glazed the balloons, raising the main balloon on dimensionals & raising the rolling hills below on dimensionals to create depth.  Here is a side on view:-


This card is for a male birthday (in September - how organised is that???) so I kept away from girlie colours & made the sun rays pointy instead of scalloped.  The rays were made by punching 3/8" squares & attaching them to the back of the circle:-


I am really happy with the finished card.  Thanks JAI!  :)

Edited (17/06/2010) to add:

The lovely ladies at JAI made this card a top pick, thank you!  You can check out the other top picks here & lots of the fabulous entries in the slideshow here.

Card Components
Carkstock:  Whisper White, Bashful Blue, Barely Banana, Summer Sun, Certainly Celery
DSP:  SU Holiday Treasures
Stamp Sets:  SU A Little Treat (Big Balloon Basket), PTI (Sentiment & Small Baskets)
Inks:  Chocolate Chip & Versamark
Other:  1.3/4" Circle Punch, 3/4" Circle Punch, Small Circle Punch, Small Square Punch, Crystal Effects, Dimensionals, SU Stampin Pastels (Chalks)

Wednesday, June 9, 2010

Misty Trees


Ooh, winter is definitely here!  It's been very chilly here morning & night, & recently we woke up to heavy mist.  Of course, what can a girl do but use this sight creatively on a project!!  :)

This week Makeesha set an interesting colour challenge.  Here are the colours:-


Makeesha & her DT provided some fantastic inspiration pieces (as always) & Keesh also provided everyone with a great tutorial on a cute card box.  (Thanks Keesh!)  It provided a perfect idea for a gift that I will be making shortly, but for now the weather provided this inspiration:-


The trees have been stamped on Kraft cardstock with Versamark ink & then clear heat embossed.  I have then brayered white craft ink over the image, utilising a torn strip of scrap paper as a mask for the ground.  Once I finished brayering, I wiped the excess ink off the trees & reheated the image to make the embossing nice & shiny.  :)

The sentiment was stamped in real red & also clear embossed.  A jumbo grommet & the reverse side of the dotty real red ribbon completes the card.  This is a good "all-round" card for my stash.

Card Components
Cardstock:  Kraft, Real Red
DSP:  Basic Grey DSP from 6x6 Hostess Pad
Stamp Sets:  PTI's Through the Trees
Inks:  White Craft, Versamark, Real Red
Other:  Grosgrain Ribbon, Jumbo Grommet

Monday, June 7, 2010

Stitched Summer


This week the team at Just Add Ink have a challenge to Just Add Stitching (you can join in here at JAI20).

The team at Michelle Perkett Studio have a challenge for a Summer themed project (you can join in here at Challenge #32).

I have combined the elements of both challenges & come up with this:-


I have made a "shadow box" style card.  The front panel is acetate & the background panel is a photograph of a field of daisies & dandelions that I found at www.imageafter.com.

I have used my sewing machine to stitch the two panels together & also to attach the ribbon to the acetate panel.  All the edges of the acetate panel have been "swiped" with white Staz On ink.


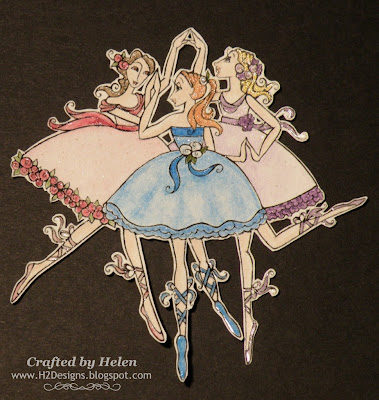
I have used Michelle's beautiful "Three Graces" image which has been printed by laser on watercolour paper & coloured with both watercolour & standard pencils.  The ballerinas have been fussy cut & then "blinged" up with glitter & glaze pens, making them sparkly & shiny!  Here is a (night-time!) shot of the ballerinas before they were added to their field of flowers:-


The image is adhered to the background photo with dimensional adhesives.  This is the view from the top of the card:-


The sentiment has been stamped, popped up & layered onto a scalloped oval.

Card Components:
Cardstock:  Whisper White, Always Artichoke
Stamp Sets:  "Three Graces" by Michelle Perkett, SU "Embrace Life"
Other:  Acetate, Premium Photo Paper, Grosgrain Ribbon, Large Oval & Scallop Oval Punches, Dimensional Adhesives, Sakura Glaze Pen, Spica Glitter Pen, Metallic Glitter Pens, Sewing Thread

Thursday, June 3, 2010

Besotted with Brocade Blue!


Well, after a bit of an (unintentional) break from challenges, happily this week I have been able to play again & seem to be a bit taken with SU's Brocade Blue!

Makeesha has set a great sketch challenge (& you can play along here). Keesh & the Inkspirations DT have provided awesome inspiration pieces & all the challenge entries are beautiful, so make sure you go check them out!


I loved the sketch so much I have made two cards & I know it is a design that I will use again (& again)....  Thanks Keesh!  :)

Here is my first effort:-


This little plane is sooo cute!  I have stamped the plane & then covered the fuselage with crystal effects to give it lots of glossy shine.  I have used a glaze pen on the propellor, wheel, windscreen frame & controls for a light shine  The plane is fussy cut & popped up on high dimensionals & the banner is popped up on slightly lower dimensionals.  I also added a small, punched star to the tail which was coated with crystal effects.


The clouds on the circular background were created by punching a scalloped circle from scrap paper & then chalking around the top edge using SU Pastels & repeating the process, moving upwards on the panel.  The panel is mounted & then the whole piece is layered onto the card with dimensionals.  I also added crystal effects to the dots on the blue strip.

The silver star shaped studs are from my sewing supplies from way back when my sewing machine was used for material & not paper! (lol)

My second card also features Brocade Blue:-


I was lucky to get to use the Asian Artistry hostess set at Jenni's recently, using markers to colour the irises.  I have added a small, silver dragonfly brad that I have had for ages & then popped up the mounted circular panel on dimensionals.

I have added the sentiment to the side, popped up & layered onto grosgrain & then satin ribbon.  The rhinestones have been layered onto tiny buttons that were a perfect colour match!  :)

Here's a close-up of the little dragonfly:-


Well, that's all from me. All the supplies used are listed below.

Card Components
Cardstock:  SU Brocade Blue, Riding Hood Red, Whisper White
DSP:  Hostess 6x6 DSP Pad (Brocade Blue), Haiku (Old Olive)
Stamps:  PTI Up & Away (Plane & Banner), SU Asian Artistry (Irises), SU Teen Tiny Sentiments (Just For You)
Inks/Markers:  Brocade Blue, Chocolate Chip, Riding Hood Red, Old Olive
Other:  Crystal Effects, Glaze Pen, Dimensional Adhesives, SU Stampin Pastels (Chalks), Star Brads, Dragonfly Brad, Mini Buttons, Rhinestones, Grosgrain Ribbon, Satin Ribbon, Mini Star Punch, Scallop Circle Punch, CM Cutting System