Pages

Thursday, July 29, 2010

Keesh's Challenge - Little Owl


Here is a second (late night) entry for Keesh's Sketch Challenge #33:-


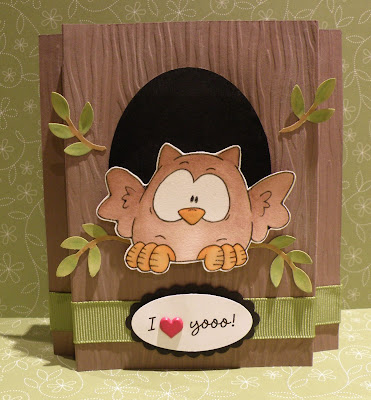
This little owl has been floating around on my workspace for a while & I decided he needed a hollow to sit in!  Keesh's sketch worked perfectly:-


As you can see, I have replaced the top two "stripes" with leafy twigs (using the Bird Punch). 

I have created a "shadow box" card.  The front panel of the tree trunk has been cut from Close to Cocoa cardstock which has been embossed with a Fiskars texture plate.  It was then chalked to add some "depth".  The twigs were punched from Kiwi Kiss cardstock, trimmed, coloured with pencils,chalked & shaped.  The back panel of the card was cut from Basic Black cardstock to create the hollow.

The sentiment was computer generated & a heart brad was added.  The oval has been popped up on dimensionals onto the scalloped oval & layered onto Kiwi Kiss grosgrain ribbon.

The cute little owl is a digi image from artist/illustrator Dustin Pike.  He (the owl!) has been printed onto watercolour paper & coloured with stamp pad inks & an aquapainter.  His beak & claws have been given a coat of Crystal Effects.

Shadow box cards are really quick & fun to make, & they flatten out to go into an envelope.  :)

Card Components
Cardstock:  Close to Cocoa, Basic Black, Kiwi Kiss, Watercolour Paper
Stamps:  Owl by Dustin Pike
Inks:  Close to Cocoa, Pumpkin Pie
Other:  Crystal Effects, Heart Brad, Pencils, SU Stampin Pastels (chalks), Bird Punch, Large Oval & Scallop Oval Punches, Texture Plate, CM Cutting Ovals

Tuesday, July 27, 2010

Rainy Day Emma - Keesh's Challenge #33


Hithere!  This week Keesh has a sketch challenge to get us creating. :)  You can check out the beautiful DT inspiration pieces, as well as play along here.  Here is the challenge image:-


I haven't been able to join in for a little while, so this week I was keen to give it a go.  I have had this digi image for a couple of months & hadn't printed her yet but after seeing Keesh's gorgeous card from the last challenge (here), I decided to get her inked up!  Here is my card:-


As you can see, I have rotated the sketch to accommodate the fence in the background panel.  Both images were printed on my inkjet printer onto watercolour paper & then coloured with stamp pad inks & an aquapainter.

To make Emma's raincoat shiny, I have coated it with LOTS of Crystal Effects & her boots have had the same treatment!  To make the trendy patterns on her boots I printed a second image of Emma & cut out just her boots to create a reverse mask.  With the mask in place, I inked my little flower stamp with Versamark ink & then yellow ink & stamped flowers on each boot, then I clear embossed the flowers.  Next I watercoloured the turquoise on the boots & once it was dry I coated the boots in several layers of Crystal Effects.


I have added Spica glitter to her hair & the centres of the flowers.  The dots on the umbrella were made with a white glaze pen.  The handle of the brollie has also been glazed.


Emma has been fussy cut & popped up on dimensionals.


Edited to Add:

I am very excited to add that Keesh chose my entry this week, so next week I get to join her amazing team as "Guest Designer"!  Thanks Keesh :)

Card Components:
Cardstock:  Chocolate Chip, Tempting Turquoise, Watercolour Paper
DSP:  Regal Rose Patterns from 6x6 Hostess Pad 
Stamps:  SU Season of Joy, CC Rainy Day Emma, CC Field Fence, PTI Everyday Button Bits
Inks:  Chocolate Chip, Close to Cocoa, Blush Blossom, So Saffron, More Mustard, Yoyo Yellow, Tempting Turquoise, Regal Rose, Kiwi Kiss, Old Olive, Baja Breeze
Other:  Button, Satin Ribbon, Spice Glitter Pen, Clear Glaze Pen, White Glaze Pen, Crystal Effects, Dimensionals

Tuesday, July 20, 2010

Old Guys Rule! (JAI26)


This week the team at JAI has put out the challenge to use embossing - you can play along & check out the fantastic DT samples & entries here.

I created a really simple project with dry embossing (seeing as on last week's entry I had heat embossing to the max!):-


Nice & easy this one, the riding hood red panel has been dry embossed (scored) at 1/2" intervals across the panel.  This is a really easy way to add some interest without detracting from other features on your project.

I also made a matching bag front for a Kraft carry bag:-


Both items feature silver hardware - a Hodgepodge label holder & a jumbo grommet & this awesome paper!  I saw this paper in my travels last week & it amused me so much that I just had to buy some.

It reads "OLD GUYS RULE - HIGH MILEAGE / LOW MAINTENANCE"!  That's just too funny!  :)


The "old guy" I gave it to was pretty happy - maybe because the bag was filled with homemade Rocky Road - YUM......

Project Components
Cardstock:  Riding Hood Red, Basic Black, Very Vanilla
DSP:  "Old Guys Rule" by Creative Imaginations
Stamp Sets:  SU Whimsical Words
Inks:  Basic Black, Riding Hood Red
Other:  Hodgepodge Hardware,  Jumbo Grommets, Grosgrain Ribbon, Kraft Carry Bag

Sunday, July 11, 2010

A Cuppa for Lynne! (JAI25)


The best thing about crafting is having great friends who share your interest, passion, OBSESSION! (lol)  :)  One of my wonderful crafting friends is Lynne who encouraged me to start my blog (you can visit Lynne's blog here).

Lynne recently asked if I could create her a cutting file for a teacup card.  We were both really happy with the result & I have decided to use one for this week's colour challenge at Just Add Ink.  (You can play along & check out all the great DT inspiration here.)  The colours are:-


The teacup layers have been cut on my Robo in Very Vanilla.  I have stamped the delicate leaf image from the SU set  Botanical Blooms in Soft Suede & then coloured the leaves with Rose Red & Elegant Eggplant SU Pastels.  The cup & saucer have been chalked to give depth & shading.


To make them glossy like china, I have covered the entire cup & saucer with Versamark ink & then used Clear Opals (thick embossing crystals) to heat emboss.  A couple of layers of Versamark & Opals has given a nice shiny finish.


The sentiment on the teabag tag is "{friend to friend}" from the Teeny Tiny Sentiments set which I have stamped as individual words minus the brackets using a marker. I added the word BLEND using alpha stamps & the heart is from the SU set Yummy.  Kitchen string & a standard staple (cut & bent to a smaller size) have been added to the tag.

On the inside I have stamped & chalked a single leaf image & matted the sentiment panel onto an Elegant Eggplant panel.


I think it's time to go & put the kettle on!  :)

Card Components:
Cardstock:  Very Vanilla, Elegant Eggplant
Stamp Sets:  All SU - Botanical Blooms (retired), Yummy (retired), Teeny Tiny Sentiments, Non SU Alphabet
Inks:  Soft Suede, Versamark
Other:  SU Pastels (Chalks), Markers, Opals (Thick Clear Embossing Crystals), Kitchen String, Staple & lots of Adhesive!!