Pages

Friday, September 30, 2011

Inkspirations Challenge #89 - Old School Embossing

Hithere, this week's challenge from the Team at Inkspirations is a great & very versatile sketch:-

I whipped out the gold embossing powder & Versamark ink & did some old school embossing, trying to capture the look of oriental screen:-


I've kept this one really simple, with gold embossing on the Basic Black cardstock panels, which are layered on vanilla & then on metallic gold cardstock.  The sentiment oval has been popped up on dimensionals & there is some vanilla taffeta ribbon between the layers.

The Inkspirations Team have some great ideas to inspire you, so please come & join us!


The Challenge Site
 
 Cindy
Kirsty
Makeesha
Renée


Brandi
Carrie
Helen
Ilina
Lee-Anne
Marisa

Card Components:  All SU
Cardstock:  Basic Black, Very Vanilla, Gold Metallic 
Inks:  Versamark, Basic Black
Stamps:  Elements of Style, Petite Pairs
Other:  Gold Embossing Powder, Vanilla Taffeta Ribbon, Oval Punch, Dimensionals

Friday, September 23, 2011

Inkspirations Challenge #88 - Shimmery Skies

Hithere, this week's colour challenge from the Team at Inkspirations is bright & fun:-
These colours made me think of Spring & the outdoors, so I thought I would make a kite.  Originally I had planned for a clean white card, with a few pops of bright colour, but I just wanted to add some fluffy (cupcake) clouds, so started the quest for a pacific point sky!


Well, as you know, pacific point is rather a strong blue & for the life of me, I couldn't get a clean brayered background, in a soft tone of this colour without faults in the brayered result.  So I worked the brayer until I got a nice even coating of colour which was very dark.  Then I sprayed it with Frost White "Shimmer Spray" that I had made up with rubbing alcohol.  This left me with a much lightened sky, so I gave the glossy cardstock another blast of "shimmer spray" & lightened it even more.  The fun part of the process was not knowing what I was going to end up with, as the cardstock colour changed quite considerably during the drying process.  The end result is a lovely shimmery sky.  You can see it a bit more in this photo:-


I made the kite using the Penant Punch & a 1" Square Punch, layering the DSP panels & sponging the edges.  The ribbons on the kite string were also made with the penant punch - I simply cut a 1/2" strip which I folded in half to make it 1/4" wide, & with the folded side down near the pointy end of the penant (but not all the way down), punched out little triangle shapes that unfolded to become the bows.  I sponged the edges of the bows using a cotton bud (Q Tip).

The kite & the front cloud have been raised on dimensionals & the string & bows have been attached using Crystal Effects:-


Wow, you should see what the rest of the Team have in store for you, so please come & join us!
The Challenge Site


Cindy
Kirsty
Makeesha
Renée


Brandi
Carrie
Helen
Ilina
Lee-Anne
Marisa

Card Components:  (SU except as noted) 
Cardstock:  Pacific Point, Melon Mambo, Whisper White, Glossy White
DSP:  Brights Patterns Stack
Inks:  Versamark, Melon Mambo, Pumpkin Pie
Stamps:  PTI Everyday Button Bits (sentiment)
Other:  Kitchen String, Penant Punch, Square Punch, Cupcake Punch, White Embossing Powder, White Frost Shimmer Paint, Rubbing Alcohol, Brayer, Sponges, Dimensionals, Crystal Effects

Friday, September 16, 2011

Inkspirations Challenge #87 - Top Note Bloom

Hithere, this week's challenge at Inkspirations is a fabulous sketch, offering all sorts of possibilities:-


I have picked up my favourite tool at the moment (SU's Top Note Die) & used it for one of the panels:-


The colours aren't very true here, but I've used Cherry Cobbler, Crumb Cake, Vanilla & Old Olive Cardstock.  The bloom has been coloured up with Cherry Cobbler, Red Riding Hood, Old Olive & Lucky Limeade markers, then I have recoloured the image with a Versamark marker & clear embossed it.  I've overstamped both the Vanilla & Crumb Cake panels with a soft script & sponged to "grunge" them up a bit.  The Olive panel has also been stamped with Crumb Cake with the new Parlor Prints background stamp to give a soft hint of colour.

The rest of the Design Team have a fantastic range of inspirational pieces to get you motivated, so please come & join us!
The Challenge Site


Cindy
Kirsty
Makeesha
Renée


Brandi
Carrie
Helen
Ilina
Lee-Anne
Marisa

Card Components:  
Drop me a line if you'd like any details.  :)

Friday, September 9, 2011

Inkspirations Challenge #86 - Birthday Bunting

Welcome to my Inkspirations post for this week.  This week's colours are fabulous:-


& were super easy to put together:-


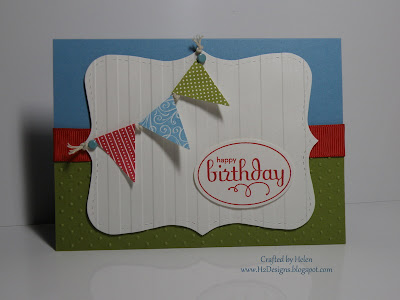
I have kept to a fairly simple design, with a touch of embossing & a string of bright bunting (or banner flags) for interest.  The tops of the flags were folded over to form a channel which the string runs through.  There is a knot between each flag & the string is simply attached to the top note die-cut with coloured brads.

We would love it if you could join us this week & play along in the challenge.  Please make sure you check out the rest of the Design Team's fantastic creations!
The Challenge Site


Cindy
Kirsty
Makeesha
Renée


Brandi
Carrie
Helen
Ilina
Lee-Anne
Marisa


Card Components:  (SU except as noted)
Cardstock:  Real Red, Marina Mist, Old Olive, Whisper White, Shimmery White
Inks:  Real Red, Marina Mist, Old Olive
Stamps: Perfect Punches & Playful Pieces (retired Hostess)
Other: Banner Punch, Wide Oval Punch, Top Note Die, Striped Embossing Folder, Dimensionals, Real Red Grosgrain Ribbon
Non SU:  Swiss Dots Embossing Folder, Blue Brads, Soft White Kitchen String

Friday, September 2, 2011

Inkspirations Challenge #85 - Susan's Motorcyle

It's Inkspirations Challenge time again.  This week's challenge sketch is a really easy one (I'm sure a few people were scared by last week's colours, lol!):-


The best thing about our wonderful craft of stamping is meeting & making friends with lots of lovely people.  One of these friends, Susan, very kindly lent me her motorcycle stamp recently, so I could make a card for a bit of a bike enthusiast.  Thank you Susan.  *Waving :)*

Here's how it turned out:-


The bike was stamped in Versamark & then embossed with black embossing powder.  It has been coloured with markers & silver metallic gel pen & then been clear embossed over the duco.  I wanted a soft background, so used chalks for the grass & sky.

The black stripes have been given a "knobbly tyre" feel, by rolling the strips through a crimper, then putting them back through the crimper again a second & third time at a 45 degree angle.

Please join us in the Challenge this week & see what fantastic projects the rest of the Team have to inspire you with:-
The Challenge Site


Cindy
Kirsty
Makeesha
Renée


Brandi
Carrie
Helen
Ilina
Lee-Anne
Marisa


Card Components:  (SU except as noted)
Cardstock:  Real Red, Metallic Silver, Basic Black, Whisper White
Inks:  Versamark Pad & Marker, Real Red, Cherry Cobbler & Basic Gray Markers
Stamps:  Motorcycle, Occasional Quotes (both retired)
Other:  Crimper, Rivet, Square Punch, Dimensionals, Chalks (Stampin! Pastels), Clear Embossing Powder, Black Embossing Powder
Non SU:   CM Circle Cutting Patterns, Cuttlebug Checkerplate Embossing Folder, Silver Gel Pen

Thursday, September 1, 2011

3D Daffodil Tutorial

Hithere, as promised, here is a tute on how to make the 3D daffodils I used on last week's Inkspirations Challenge card.  (You can see the original card here.)

Warning:  This post is very photo heavy, but hopefully it will give you clear instructions on how to make your own blooms.  Please drop me a line if would like any more info.  :)

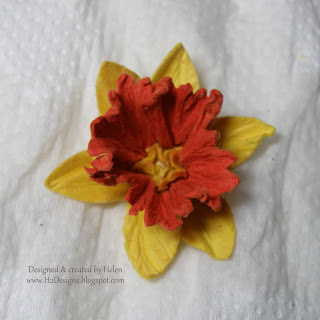
Here is a new version of the daffodils, with 6 petals (rather than 5):-


They are very 3D:-


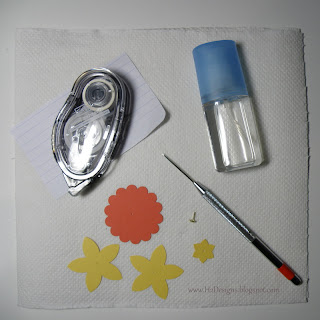
Here is what you need:-

  • 2 x 5 Petal Flower punchies (Daffodil Delight)
  • 1 x 1.3/4" Scallop Circle punchie (Tangerine Tango)
  • 1 x small six point flower punchie from Boho Blossoms punch (Daffodil Delight)
  • 1 x Brad
  • Piercing Tool
  • Spray misting Bottle (alcohol or water)
  • Adhesive
  • Scrap of thin paper (photocopy or notebook paper is great)
  • A few sheets of paper towel
 

First thing you need to do is pierce a hole in the centre of each punched piece.  Take the two five petal pieces & trim away two petals, shaping your cutting out & around from the centre hole like this:-


Take your scalloped circle & attach it to the corner of your scrap paper:-


Using the scrap paper as a "handle", maneouvre the scallop circle back into the punch, lining up the dips in the punch with the centres of the scallops in the punched shape like this:-


Punch, & you will end up with this shape:-


Layer all the punched pieces onto your brad, starting with the small six petal flower, then the scalloped circle, then the two 3 petal pieces you created.  It will look like this from the top:-


& look like this from the bottom:-


Next, with your flower sitting over the paper towel, give it a good misting with the water/alcohol.  Using your fingers, scrunch up the first layer (you may need to spray the underside of the top layer to make it more pliable):-


Give the scallop circle layer a good misting & scrunch this up & around the brad:-


Mist the 3 petal sections, front & back, & scrunch these up around the brad.  At this point, I gently roll the whole flower between my thumb & forefinger to compact it together:-


Once you are happy that your flower is well scrunched, you start gently opening up the layers, starting with the pointy petals:-


You can gently wiggle & scrunch these petals if you need to, to get the 6 petals sitting evenly.

Next, open up the scallop circle layer:-


Place the handle of your piercing tool into the centre of the daffodil:-


Pinch the scallop circle tightly up around the piercing tool to form the trumpet of the daffodil:-


You can use the point of your piercing tool to adjust the small inner petals of the daffodil if you wish.  Leave your flower to dry or blast with a hairdryer.  Here is the completed daffodil:-


When you want to attach the daffodil to your project, slide the handle of your piercing tool back into the centre of your daffodil, straighten the prongs on the brad, & then poke the brad through your project.  Re-open the prongs on the brad.

Enjoy!

Daffodil Components
Cardstock:  Daffodil Delight, Tangerine Tango
Hardware: Gold brad,
Tools:  5 Petal Punch, 1.3/4" Scallop Circle Punch, Boho Blossoms Punch, Piercing Tool
Other:  Misting Alcohol/Water, Paper Towel, Scrap Paper, Adhesive